I’ve been teaching people to snowboard for over a decade, and often I find teaching beginners to be the most rewarding kind of lesson! I love sharing my passion for the sport and seeing people catch the snowboarding bug for the first time!
This is my complete breakdown of the steps I have taught to hundreds of first-time snowboarders.
These steps will take you from complete newbie to linking your first turns in no time. These are my tried and tested techniques from teaching hundreds of people to snowboard over the last 12 years and also coaching others to become snowboard instructors. I’ve broken down each step exactly the same as I would when teaching a beginner snowboarder in person.
So let's get started and get you up and riding!
Getting to Know Your Snowboard
Before you can start riding your snowboard its a good idea to get a feel for the different parts of the board and the function they play when you are riding.
To do this, the first thing we are going to do is strap in with the front foot:
- Open up the bindings. Most bindings out there are made up of 4 main parts: the base plate, the highback and the toe and ankle straps. First, completely open the toe and ankle straps and lift up the highback.
- Put your foot in. Whilst standing behind the board, step your foot into the binding. Make sure you push the heel of your boot back so that it is up against the highback of your binding.
- Attach the ankle strap. Feed the ladder into the buckle of the ankle strap then crank it up till it’s good and tight and holding the heel of your boot firmly in the back of the binding. Your straps may need adjusting if either the strap is too long and loose or too short.
- Attach the toe strap. The toe strap attaches the same as the ankle strap. Be sure to put the toe strap cap over the toe of your boot and not across the top of your foot.
Now that you’re strapped in, things will probably be feeling pretty weird and cumbersome, but don’t worry. You will soon get used to the feel of the board and how to maneuver it. First, we are going to get the feel of the heel edge.
- Standing with your free foot behind the board, push the heel of your front foot into the snow. Push against the board and feel How the edge grips in the snow. You can play around with the angle of the snowboard and feel how with more angle you get more grip. As you flatten the board, it may start to slide away from you as you push against it. Try pushing off the board and taking a few steps backward.
- Now that you’ve got the idea of the grip of the edge, slide the board from side to side and feel how the board runs along its edge in the snow.
- Now try the same thing with the toe edge. Step your free foot over the board so that the board is behind you. Then with your front foot try and bend your ankle by pushing your knee down towards the snow. This will give you the same feeling of grip as on the heel edge. Try pushing off the toe edge and take a few steps forwards. Then slide the board back and forth the same as you did on the toe edge.
So now you should have a feel of how the edges work. We use the edges to control the snowboard from turning and changing direction to slowing down and stopping. Next we are going to strap the other foot and practice some of the positions and movements we are going to need when we start actually sliding down the slope.
First, you need to find a flat area of snow. This is really important because with both feet strapped in any slope will start you sliding so make sure it's perfectly flat. The second foot straps in exactly the same way as the first foot. So balancing on your front foot, open up the binding, step your foot in, then do up your ankle and toe straps. Now you're going to require a little bit of balance to remain standing up!
Finding your Neutral Stance Position on the snowboard
We will start off easy, with some basic flexing up and down. While keeping your weight on both feet, flex down as low as you can go, being sure to keep both feet flat on the snow. Then stand up as tall as you can, again keeping your feet flat on the snow.
That’s your full range of movement, but we want to get into your neutral riding position with your knees slightly flexed. This can vary from person to person but I would say bend your knees so that you’re about 20% shorter than normal!
Moving your weight to the nose and tail of the snowboard
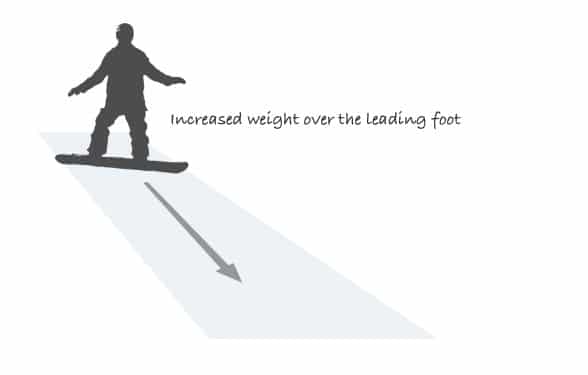
One of the most important moves when learning to snowboard is shifting your weight onto your front foot, so that’s what we are going to do next. This may sound easy, but lots of people do this wrong, especially when you start sliding and picking up speed. To make it really simple, just bend your front knee and feel how there’s a little more weight on your front foot. You should keep your upper body and shoulders relaxed, so they just follow your movement and without having to lean into it.
If you look down at your front foot, it should be covered by your knee. If you move your knee to the inside, or if you tip your upper body over too much, then you’ll be able to see your knee. These are the kind of simple self-checks that I add to my teaching technique so that you can identify and correct where you are going wrong.
Next, do the same movement onto your back foot. Then you can try and shuffle your weight between one foot and the other.
Ok, now that you’ve explored the length of the board, it’s time to start moving your weight over the edges of the snowboard. We use the edges of the board to control the snowboard so this is a key part in learning to snowboard.
Balancing on the heel edge of the snowboard
From the neutral position, with your weight on both feet and keeping your knees slightly bent, push your hips backward whilst keeping your hand reaching forwards. Kind of the same movement as if you were slowly sitting back into a chair. You will start to feel your weight rock onto your heels, and the toe edge of the snowboard lift clear of the snow.
Try and balance in this position with your toes off the ground. This is the position for a heel edge side slip which we will be getting onto soon.
Balancing on the toe edge of the snowboard
Next, we’ll try and do the same on the toe edge. The majority of people struggle more with the toe edge than the heel edge, and there’s definitely a right way and a wrong way to do it. This is the right way: With your weight on both feet, push your knees forward and towards the ground. You should feel your weight rock onto the balls of your feet and your heels lift off the snow. Try and hold this for a few seconds.
The wrong way to do the toe edge is by trying to stand too much on your tip-toes. The key is to keep your ankles relaxed and just focus on pushing your knees forward.
Once you’ve got the feel for balancing on both edges, you can try rocking from one edge to the next. To mix it up you can try balancing for a moment on each edge and switching between one and the other.
Ok so now that you’ve got the hang of the basic moves, it’s time to unstrap from the board and make your way up the hill.
Snowboard Side Slipping
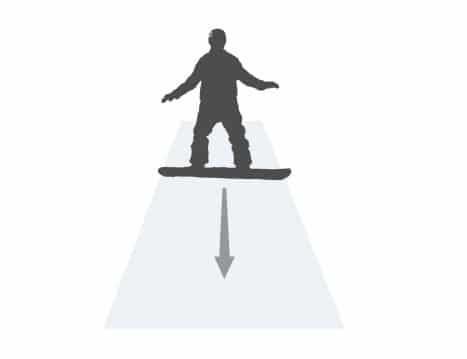
Side slipping is the first move you are going to do on your board. It introduces you to the edges of the board and how they can be used to control your speed. When your board is in the side slip position it is exactly 90 degrees across the slope of the hill, or the fall line. The board then slides sideways down the hill with your weight over the edge of the board.
For side slipping, you want to find the right gradient of slope. You don’t want it too steep but you don’t want it too flat either. Normally the main beginner slope in your local resort will be about right, but not where the beginner skiers and tiny kids are, that tends to be too flat.
Putting your snowboard on
Now that you are at the top of the slope, strapping into your board works a little differently. Firstly, if you are going to leave it on the floor, make sure you leave it flipped over onto the bindings. Otherwise, you’ll be running down the hill after it.
Take a seat in the snow with your board out in front of you and both bindings open. Put your front foot in first and make sure to push your heel to the back of the binding. Do the ankle and toe straps up nice and tight, then do the same thing with your back foot. You can test if our bindings are tight by moving your knees around and making sure there’s no movement in the bindings.
Standing up
Standing up can be a little difficult on your heel edge but there are a few do’s and dont’s which can make it a whole lot easier:
Firstly make sure your snowboard is pointing exactly 90 degrees across the hill. shuffle your butt as close to your bindings as possible, try and keep your butt on the snow so that your hips don’t lift up. As you do this, make sure you keep your toes pointing upward so that the heel edge keeps digging in the snow. This requires a little bit of flexibility in the hips, so if you struggle to do this it might be time to break out the yoga mat!
Next, put one hand behind you and push yourself up off the snow. With the other hand, keep reaching forwards down the hill so that your weight comes over your feet.
This will rock you onto the heels of your feet. Next, push up with your legs and slowly stand up.
Heel Edge Side Slip
So now you should be standing up with your knees slightly bent with your weight on both feet. Your hips should be pushed back a little so that your weight is on your heel edge. You want to keep your hands forward a little so that your shoulders and back are slightly rounded.
If you get this right you should be able to balance on your heel edge without moving anywhere. However, this is a little tricky for the first-timer, so it's a good idea to get a buddy to help you up and get your balance for your first try.
In the sideslip, you control your speed by angling the edge of the board into the snow; the greater the angle the slower you go, and the flatter the board is the faster you go. To get moving, stand up a little straighter, bring your hips forward a little, and allow your feet to flatten off towards the snow. This will get your board sideslipping straight down the hill.
It's important to always keep your toes in the air so that the toe edge of your board is clear of the snow.
To slow down, push your hips back as you bend your knees and your toes lift up. This will increase the edge angle, causing your board to grip the snow and slow you down.
The tricky thing about side slipping is figuring out the right amount of bite the edge needs to control your speed. Play around with this for a few runs until you can smoothly start/stop and control your speed.
Toe Edge Side Slip
Most people find the toe edge harder than the heel edge side slip. This is mainly because you are facing up the slope whilst traveling backward down the hill, which can be a little scary! Also, it can be a little harder to find the sweet spot for a smooth side slip on the toe edge. But let's give it a go!
Strap your board on, the same as you did for the heel edge, then roll over so that you end up on your hands and knees looking back up the hill.
Next, to stand up, start walking your hands toward your feet. You should keep your ankles relaxed so that you feel your shins pressing against the tongue of your boots. Then stand up with your knees bent and look up the slope in front of you.
To start moving, stand up a little taller so that your knees straighten and you feel a little less pressure on the front of your boots. This will flatten your feet towards the snow and start you moving. Do this slowly so you can get a feel for the point at which the board starts to slide.
To slow down and stop, push your knees forward and down so that you press against the front of the boots. This will lift your heels, causing the toe edge to dig into the snow and slow you down.
The key with the toe edge side slip is to relax your ankles and not try and use your feet to create the edge angle. Instead, try and tune into the pressure with which you are pushing into the front of the boots and use this to regulate your speed.
Traveling backward can be a little scary, so get your buddy to give you a shout if there is someone or something behind you that you need to avoid. Try and resist the urge to twist your upper body round to look down the hill, as this can cause some funky stuff to start happening with your board. Anyways, next, we are going to move onto the diagonal side slip when you can better see where you are going!
Diagonal sideslip
The idea with the diagonal sideslip is to transition from the sideslip to the board traveling along its length. This is pretty key if you're going to be able to link your turns and flow from one to the other. You can keep progressing with your diagonal sideslip from just moving across the hill a little to a full-on traverse where there is no side sleeping at all.
Toe edge diagonal sideslip.
All we need to turn a side slip into a diagonal side slip is a little shift of your weight either to the nose or tail of the board. Just as we did with the static exercises, bend your front knee to shift your weight to the front of the board. This will make the nose of the board a little heavier and cause it to move across the hill. As you do this, turn your head to look where you are going. Try and pick a spot in the distance and see if you can ride across to it.
To slow down, move your weight back onto both feet and look back up the hill in the direction you came from.
Next, switch it around to move back in the other direction. Bend your back knee to shift your weight toward the tail of the board. This will start you riding backward or switch.
To progress the diagonal sideslip into more of a traverse, you need a little more edge grip. This is exactly the same movement as you do to slow down on the toe edge. Press your knees forward, so you lean more into the front of the boots and lift up the heel edge.
Heel edge diagonal sideslip
Next up is the heel edge side slip. The basic mechanics are exactly the same as on the toe edge, with just a little bit of weight shift between the nose and tail being introduced. Some people struggle a little more to get the edge grip on the heels, so make sure you can control your speed with a straight sideslip on the heels first. You should be able to get enough heel edge purchase that you can smoothly apply the breaks.
Start with a slow, controlled heel edge side slip, then bend your front knee to shift your weight towards the nose of the board. This will get your board moving across the slope. As you do this, turn your head to look in the direction of travel and try and fix a point to aim at. You can also reach out with your lead hand over the nose of the board. This will help you tune in to where your weight is as well as keep your upper body aligned with the board.
To slow down, move your weight back to the center so that you return to a straight side slip and slowly apply the brakes to reset before heading in the other direction.
Next, bend your back knee, shifting your weight to the tail of the board, and turn your head to look back towards the other side of the slope. This will start you sliding back in the other direction.
Snowboard Garlands
Next comes the garland. This step is crucial in progressing from diagonal side slipping to trying your first turn. So don’t rush this stage. With the Garland, we start to turn the board down the hill and around the arc of the turn. This means you will start to pick up a little more speed and build up your confidence riding faster and regaining control.
So let's start with the tech theory of the garland: The aim of the garland is to start the board turning using torsional flex or, to put it in simple terms twisting the board. With the front foot, we do what is called a front foot peddle to twist the snowboard and flatten the front of the board, releasing the edge. When we combine this with the weight shift to the front foot, the result is a back part of the board, which is lighter and has the edge gripping into the snow, and a heavy front end of the board with little edge grip. This imbalance starts the board turning by causing the front end of the board to swing down the hill.
If that sounds complicated, don't worry! All this is achieved by adding one simple movement into the mix:
Find a flat patch of snow, and with both feet strapped in, shift your weight onto your front foot. Next, try rolling your front foot from the toe to heel edge. Notice how the board twists a little, with the back foot staying flat on the snow and the front foot rolling from edge to edge? This is the front foot pedal, and it's how we start turning the board.
Heel Edge Garland
We are going to start where we left off on the diagonal heel-edge side slip. But instead of heading across the slope, we are going to start turning the board down the hill towards the fall line. Instead of just shifting your weight onto your front foot, you need to get your weight forward and project down the hill. To do this, try reaching with your front hand out over the front foot and down the hill at a 45-degree angle. As you do this, your front knee should also push forward down the hill. This will flatten your front foot and release the edge turning the board down the hill. As you do this, the board will turn and start to pick up speed as it heads down the hill.
The key thing here is to keep your weight on your front foot
Keeping your weight on your front foot is key to keeping the board under control during the turn…and the one thing that most people struggle with. Unfortunately, it seems that our natural reaction is to back off when we feel out of control, and this is exactly the wrong thing to do. So try and always remind yourself to keep your weight forward on your front foot when trying the Garland.
To turn the board back across the hill and slow down just do the same movement in reverse: pull your knee back which will increase the amount of edge under your front heel and move your weight back to both feet. This will get you back into the diagonal side slip position.

The great thing about the Garland is that you can start off easy by just turning the board a fraction down the slope. Then, as you build your confidence you can turn the board more and more towards the fall line.
The goal of the Garlard is to be able to turn the board all the way down to the fall line so that you are on a flat base with the board riding straight down the slope and to be able to slow down again by turning the board back across the slope into a side slip position.
Once you can do this on the heel edge it's time to try the same on the toe edge.
Toe Edge Garland
The theory is the same as the heel edge garland; we are using the front foot peddle to torsionally twist the board and release the edge towards the front of the board, causing it to swing down the hill
From the toe edge diagonal side slip position, we need to twist and flatten the front of the board, which will release the edge. Start in the diagonal sideslip position with your weight on your front foot and your leading arm reaching forward. Now try and rotate your shoulders slightly down the hill so that your hand reaches down the hill. As you do this, allow your head to turn to look down the slope and let your lead hip follow. Now feel what is happening in your boots, if you do this right you should feel that your shin starts to move away from the tongue of the boot. With your weight on your front foot, all you need is a slight movement of your leg off the front of the boot to start the board turning down the hill.
To turn your board back across the hill and slow down, turn your head and shoulders to look back up the hill whilst pushing your shin back into the tongue of the boot.
Keep playing around with this movement as you traverse across the slope. Try and turn the board a little further down the hill each time, being sure to keep your weight on your front foot.
Your first S-turns on a Snowboard!
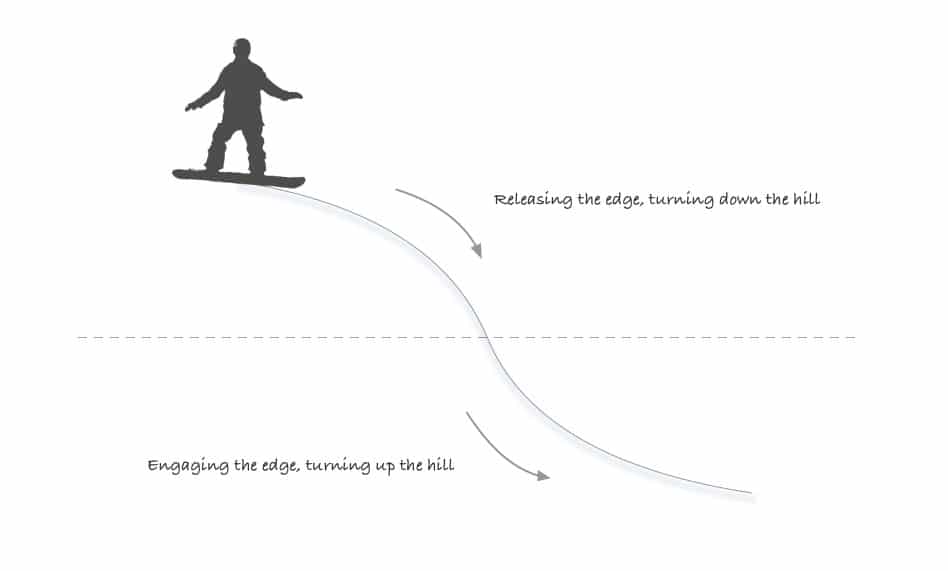
Once you’ve got the feel for both the toe and the heel edge garland and can turn the board all the way to the fall line, then you have all the pieces of the puzzle needed to complete your first turns.
The only step that is missing is the edge change. Changing from one edge to the next is just an extension of the movements that we have been doing during the Garland. I’ve found the best way for beginners to get the feel of the turn is to break it into two halves with a short straight run in between.

To do a full S-turn, you need to do two different turns: A toe-to-heel edge turn and a heel-to-toe edge turn. I normally start people off on their toe edge and ask them to turn onto their heels
This toe-to-heel edge turn is as follows:
- Starting on the toe edge, turn the board all the way down the hill to the fall line.
- Let the board straight run for a couple of meters with a flat base
- Then turn the board back up the hill on the heel edge until you are in the side slip position
For this, it's important that you pick the right bit of slope, which is not too steep, so that you don’t pick up too much speed during the straight run! Try and fully regain control of the board with a short side slip before attempting the next turn, the heel-to-toe turn:
- Starting on the heel edge, turn the board all the way down the hill to the fall line.
- Let the board straight run for a couple of meters with a flat base
- Then turn the board back up the hill on the toe edge until you are in the side slip position
If you get these two turns right then, the next aim is to close the gap between the two halves of the turn so that you are eliminating the straight run and instead of rolling onto the new edge.
Again, the most important factor for getting a smooth turn is KEEPING YOUR WEIGHT ON YOUR FRONT FOOT!!
9 times out of 10 this is why people struggle linking the turns. So if you feel yourself backing off the front foot during the turn, try revisiting the Garlands or find a gentler slope where you won’t pick up as much speed.
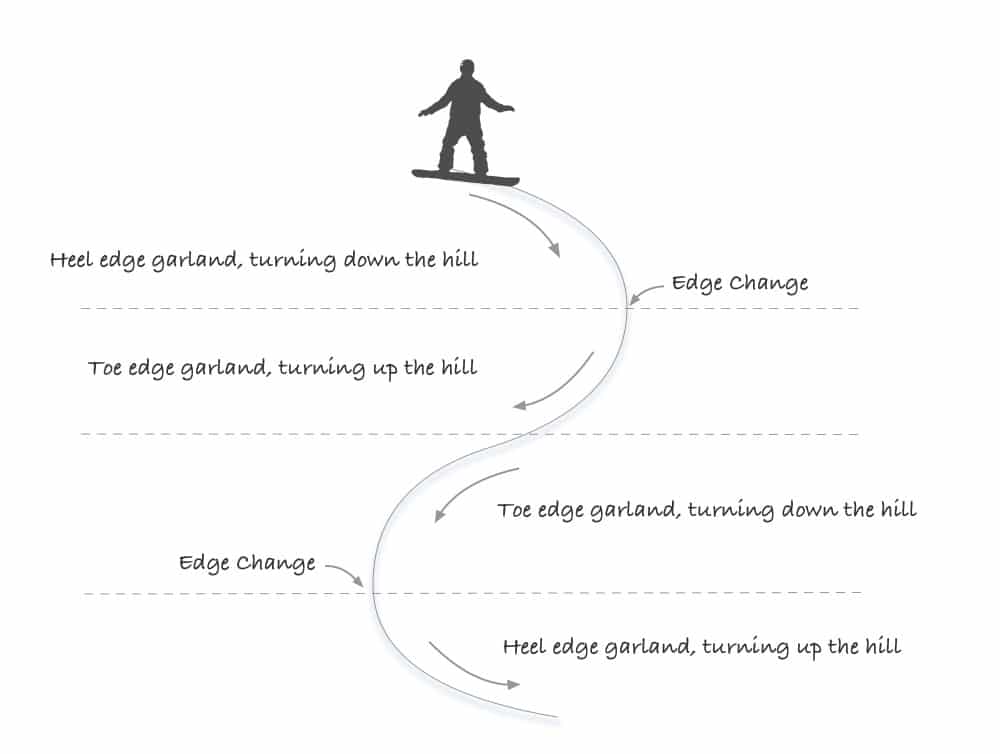
Adding some flow
Once you can turn the board from one edge to the other, then it's time to add a little bit of flow! This will transform your turns into smooth S-turns. All we need to do is to eliminate the side slip between the turns and add a little traverse across the slope.
As you complete each turn, try fixing on a point across the slope and try and use the speed you’ve gained in the turn to ride across to it. Make sure you fully complete each turn so that you don't carry too much speed. This should eliminate the need for any side-slipping and allow you to carry the right amount of speed into the next turn.
Congratulations! You can Snowboard!
If you get this far then, you have done an awesome job! Learning the basics of the turn is a major milestone along the way to becoming a fully-fledged snowboarder.
Keep practicing on the beginner slope until you can link 10 -15 turns together without too much hesitation. From this point, the opportunities of snowboarding start to open up for you; you can head up the mountain and start riding steeper slopes or at higher speeds. Or you can start working on your first freestyle moves.
The possibilities of snowboarding are endless, so don't be afraid to experiment and try something new. Just be sure to stay safe, and you will really begin to see a steep progression!
The end…now sign up to our newsletter!
Get more snowboarding tips and news on deals on the latest kit